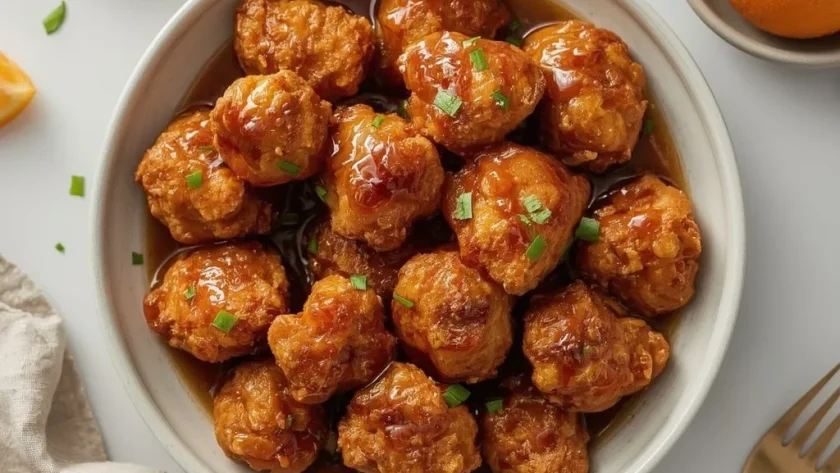
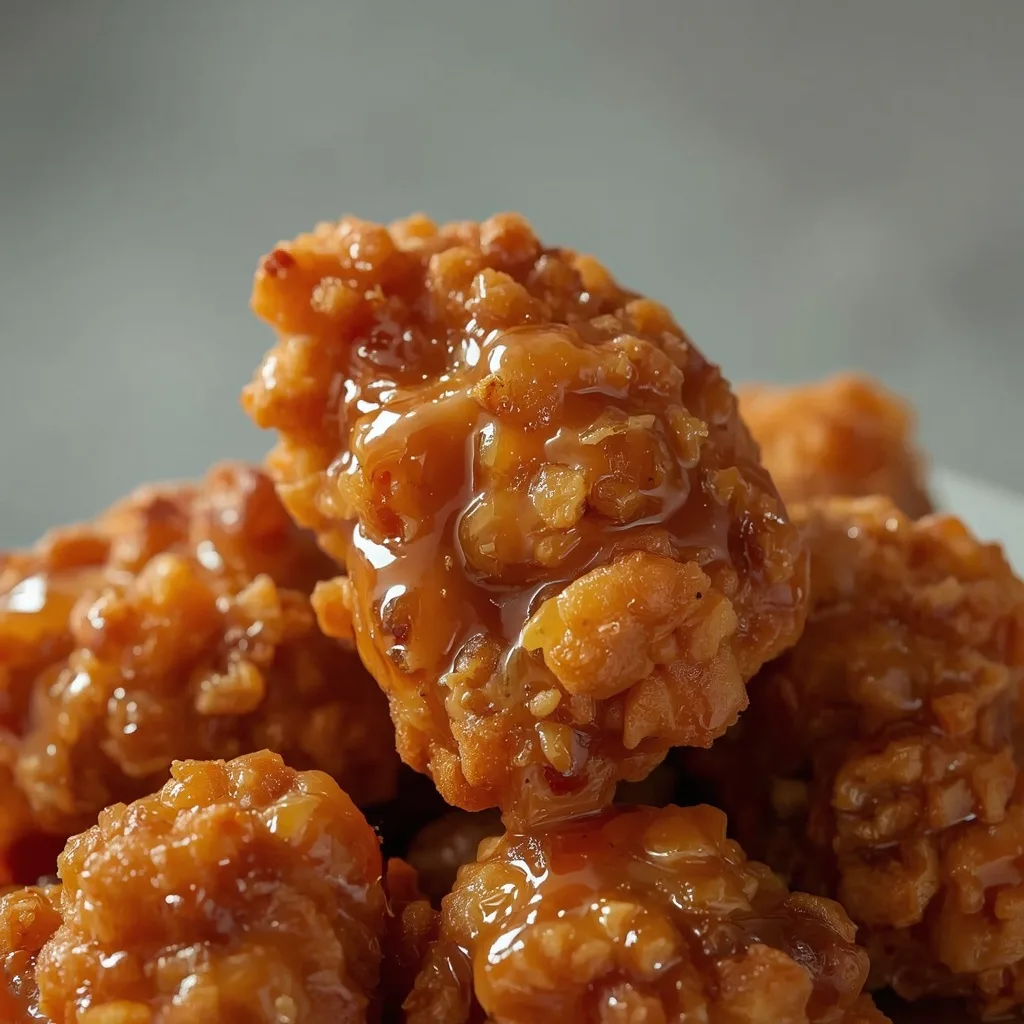
Pioneer Woman Orange Chicken Recipe
I knew I wanted a version of Pioneer Woman Orange Chicken that actually delivered on crunch without drowning in sugary goo. This recipe hits that sweet spot between sticky glaze and shatteringly crisp coating, all done in about 40 minutes from start to finish.
It works for a busy weeknight dinner when takeout cravings hit or for feeding a crowd that wants something fun and saucy. The stovetop method keeps things simple — no deep fryer required — and the balance of fresh citrus, soy, and a whisper of heat makes every bite worth the effort.
What are Pioneer Woman Orange Chicken?
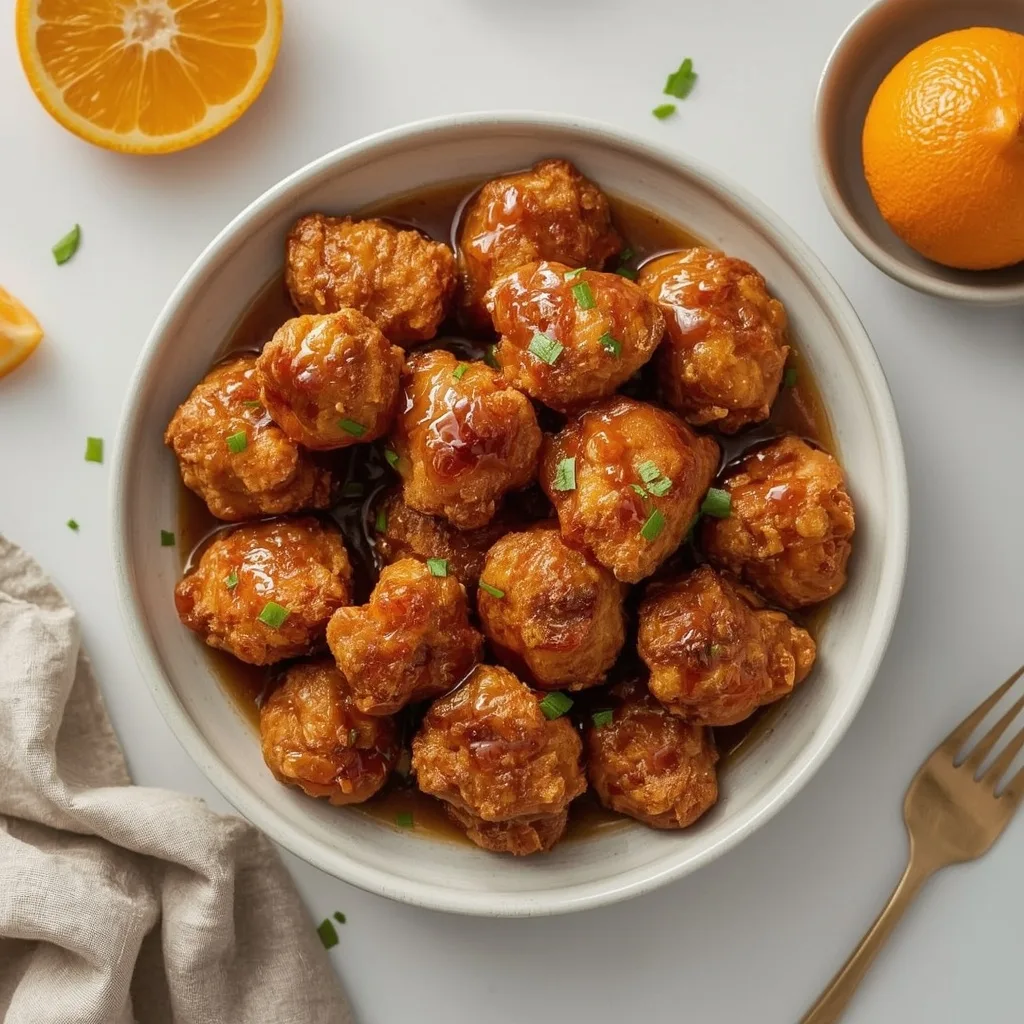
This dish takes tender chunks of chicken breast, coats them in a light cornstarch-and-flour crust, then fries them until golden and crunchy. A glossy, tangy-sweet orange glaze brings everything together — think sticky, citrusy, and just a little savoury from soy and ginger. The texture stays crisp for a few minutes after tossing, so serve it right away over rice for the full experience.
Why You’ll Love This Recipe
- Better than takeout — You control the sweetness, salt, and heat, and the chicken stays crunchier than most delivery versions.
- Fast enough for a Tuesday — 20 minutes of prep and 20 minutes of cooking means dinner is on the table before you would even finish ordering.
- Simple pantry ingredients — Nothing fancy here. Cornstarch, flour, citrus, soy, and a few basic aromatics do all the work.
- Customizable heat level — The red pepper flakes are optional, so you can dial it up for spice lovers or leave it out for a milder crowd.
- Crispy coating that stays on — The egg-and-dredge method creates a shell that clings through the toss, not a soggy mess.
- No deep fryer needed — A heavy-bottomed pot and a thermometer are all you need to get that golden crust.
Essential Ingredients for Pioneer Woman Orange Chicken
Each ingredient has a specific job here — swapping blindly can change the texture or flavour profile significantly.
For the Chicken Coating
- 1 1/2 lb boneless skinless chicken breasts, cut into 1-inch cubes — Uniform pieces fry evenly. Pat them very dry before coating; moisture is the enemy of crispiness.
- 1/2 cup cornstarch — This is the star for crunch. Cornstarch creates a lighter, crisper crust than flour alone.
- 1/4 cup all-purpose flour — It adds structure to the coating. The 2:1 ratio of cornstarch to flour is key to the texture.
- 1 large egg, beaten — The glue that holds the dry mix to the chicken. Let excess drip off before dredging to avoid clumps.
- 1/2 tsp kosher salt — Seasons the coating from the inside out.
- 1/4 tsp white pepper (or black pepper) — White pepper gives a milder, more authentic takeout flavour. Black pepper works fine if that is what you have.
For the Orange Glaze
- 1/2 cup fresh orange juice (from 1 large orange) — Fresh juice makes a noticeable difference. Bottled juice tends to taste flat and overly sweet.
- 1/4 cup low-sodium soy sauce — Regular soy sauce will make the glaze too salty. Low-sodium keeps the balance in check.
- 2 tbsp rice vinegar — A bright acidity that cuts through the sugar and keeps the sauce from being cloying.
- 1/4 cup granulated sugar — Provides the main sweetness and helps the glaze get glossy.
- 2 tbsp packed brown sugar — Adds a deeper, almost caramel-like note that granulated sugar alone cannot replicate.
- 1 tbsp orange zest (from 1 orange) — The zest carries concentrated citrus oil. Do not skip it — it is where the real orange flavour lives.
- 2 cloves garlic, minced — Fresh garlic is non-negotiable here. Pre-minced jarred garlic will taste harsh and lack sweetness.
- 1 tsp grated fresh ginger — Grate it on a microplane or the fine side of a box grater. The tiny bits melt into the sauce.
- 1/4 tsp red pepper flakes (optional) — The heat is subtle at this amount. Add more if you want a noticeable kick.
- 1 tbsp cornstarch mixed with 2 tbsp cold water (slurry) — This thickens the sauce to a glossy, clingy consistency. Stir it again right before adding because the cornstarch settles fast.
For Garnish
- 1 tbsp sesame seeds — Toasted or raw both work. They add a nutty pop and visual contrast.
- 2 green onions, thinly sliced — Freshness and colour that balance the rich glaze.
Equipment You’ll Need
- A heavy-bottomed pot or Dutch oven — Holds heat steady for even frying and prevents temperature drops when you add the chicken. A deep saucepan works too if that is all you have.
- A deep-fry thermometer — Essential for maintaining 350°F (175°C). Guessing leads to greasy or burnt chicken.
- A small saucepan — For simmering and thickening the orange glaze. Nonstick is convenient for easy cleanup.
- A slotted spoon or spider strainer — Lifts the chicken out of the hot oil cleanly and lets excess oil drip off before draining.
- A paper-towel-lined baking sheet — Catches the oil from the fried chicken and keeps it from steaming on a solid surface.
Instructions to Make Pioneer Woman Orange Chicken
The process moves quickly once the oil is hot, so measure everything before you start. Here is the sequence in detail.
- Prepare the chicken — Pat the chicken cubes very dry. Whisk the cornstarch, flour, salt, and white pepper in a shallow bowl. Beat the egg in another bowl. Dip each piece into egg, let the excess drip off, then dredge in the dry mix, pressing gently. Shake off extra coating and place on a plate.
- Heat the oil — Pour about 2 inches of vegetable oil into your pot. Attach a thermometer and heat over medium-high until it reaches 350°F (175°C). A drop of batter should sizzle immediately. Line a baking sheet with paper towels nearby.
- Fry the chicken in batches — Add one-third of the pieces to the hot oil. Do not crowd the pot — overcrowding drops the temperature and makes the crust greasy. Fry 4 to 5 minutes, turning occasionally, until deep golden brown and the internal temperature hits 165°F (74°C). Transfer to the paper-towel-lined sheet. Let the oil return to 350°F between batches.
- Begin the sauce — While the chicken rests, combine orange juice, soy sauce, rice vinegar, both sugars, orange zest, garlic, ginger, and red pepper flakes in a small saucepan. Whisk and place over medium heat. Cook, stirring occasionally, until it reaches a full simmer and the sugars dissolve, about 3 minutes.
- Thicken the glaze — Stir the cornstarch slurry to recombine, then pour it into the simmering sauce while whisking constantly. Continue whisking 1 to 2 minutes. The sauce should coat the back of a spoon and look glossy, like thin honey. Remove from heat.
- Toss the chicken — Put all the fried pieces in a large heatproof bowl. Pour the warm sauce over the top. Use a rubber spatula or tongs to fold gently until every piece is evenly coated. Work quickly so the crust stays crisp.
- Garnish and serve — Transfer to a platter or individual plates. Sprinkle with sesame seeds and sliced green onions. Serve immediately over steamed white rice or alongside stir-fried vegetables. The texture softens as it sits, so do not wait.
Common Mistakes I Made (And How I Fixed Them)
Here is what tripped me up the first few times I tested this recipe.
- Soggy coating within minutes — I used to let the chicken sit in the sauce too long before serving. Now I toss and plate immediately, and the crunch lasts through the meal.
- Clumpy, uneven breading — I was not letting the excess egg drip off before dredging. A quick shake over the egg bowl fixes that and gives a thin, even coating.
- Oil temperature dropping too low — Adding too many pieces at once caused the oil to plummet below 325°F. Frying in smaller batches with a thermometer check between each one solved it.
- The glaze turned out gritty — I added the cornstarch slurry without stirring it first. The cornstarch had settled at the bottom of the cup. A quick re-stir just before pouring prevents lumps.
- The sauce was too thin — I pulled it off the heat too early. Letting it simmer a full 2 minutes after adding the slurry gives it time to reach that honey-like consistency.
- Overcooked, dry chicken — I fried the pieces too long trying to get extra colour. Checking the internal temperature at 4 minutes instead of guessing kept the meat juicy.
Best Tips for Pioneer Woman Orange Chicken Success
- Pat the chicken extremely dry — Any surface moisture weakens the egg coating and creates steam pockets that make the crust fall off during frying.
- Fry in small, even batches — Overcrowding drops the oil temperature by 30 degrees or more, leading to greasy, soft coating instead of crisp, golden pieces.
- Let the oil return to 350°F between batches — Rushing this step guarantees inconsistent results. Give it a full minute or two with the thermometer visible.
- Whisk the glaze constantly while adding the slurry — The cornstarch can clump if it hits a hot spot. Constant motion keeps the sauce smooth and glossy.
- Work quickly when tossing — The hot sauce softens the crust the longer it sits. Fifteen seconds of gentle folding is enough to coat every piece evenly.
- Serve immediately after garnishing — This dish waits for no one. The contrast between warm sticky glaze and crunchy coating fades fast, so have your rice ready before you toss.
- Taste the sauce before tossing — Adjust the sweetness or heat at this stage. An extra splash of orange juice brightens it; more red pepper flakes or a pinch of cayenne turns up the heat.
Best Ingredient Swaps for Pioneer Woman Orange Chicken
- Chicken thighs for breasts — Boneless skinless thighs stay juicier and are more forgiving if you accidentally over-fry by a minute or two. Cut them into the same 1-inch cubes.
- Tamari or coconut aminos for soy sauce — Tamari is gluten-free and slightly richer. Coconut aminos are milder and sweeter — reduce the sugar by a tablespoon if you use them.
- Lime juice and zest for orange — A lime version gives a tangier, more东南亚 flavour profile. Use the same amounts and add a pinch more sugar to balance the acidity.
- Arrowroot powder for cornstarch — Arrowroot creates an equally crisp coating and works the same way in the slurry. Use the same measurements by volume.
- Honey for granulated sugar — Honey adds floral notes and a slightly thicker texture. Use 1/3 cup honey in place of the 1/4 cup granulated sugar, and reduce the brown sugar to 1 tablespoon.
- Rice flour for all-purpose flour — Rice flour makes the coating even crunchier and keeps it gluten-free. Swap the 1/4 cup flour for 1/4 cup rice flour with no other adjustments.
Delicious Variations to Try
- Spicy Szechuan version — Add 1 teaspoon of Szechuan peppercorns (crushed) and 1/2 teaspoon of chili oil to the sauce. The numbing heat pairs beautifully with the citrus.
- Mango orange fusion — Replace half the orange juice with mango purée and add 1 tablespoon of fresh lime juice. The fruit sweetness rounds out the tangy glaze.
- Garlic-ginger overload — Double both the garlic and ginger for a punchier, more aromatic sauce. Add the extra garlic in the last 30 seconds of simmering so it does not turn bitter.
- Smoky maple variation — Swap the brown sugar for maple syrup and add 1/2 teaspoon of smoked paprika. The smokiness contrasts with the bright citrus in an unexpected way.
- Keto-friendly version — Use pork rind crumbs (crushed fine) instead of the cornstarch-flour mix and replace the sugar with a monk fruit-erythritol blend. The sauce will be less sticky but still flavorful.
- Crunchy peanut orange — Add 2 tablespoons of crunchy peanut butter to the sauce after simmering and garnish with crushed peanuts and cilantro instead of sesame seeds.
How to Store Leftovers Properly
- Refrigerate in an airtight container — Leftovers keep for up to 3 days, but the coating will soften significantly. Separate the chicken from any extra sauce if possible.
- Freeze unglazed chicken only — Place the fried chicken pieces (before tossing in sauce) in a single layer on a baking sheet, freeze solid, then transfer to a freezer bag. They stay good for up to 2 months.
- Thaw frozen chicken overnight in the fridge — Then reheat and toss with freshly made sauce for the best results. The pre-frozen crust re-crisps better than leftover sauced chicken.
- Do not microwave leftovers — The microwave turns the coating into a soft, chewy mess. Reheat in the oven or air fryer for any chance at crunch.
How to Reheat Pioneer Woman Orange Chicken
The texture will never be exactly like the first fry, but these methods come close without turning the coating into paste.
- Oven method (best overall) — Arrange leftovers in a single layer on a baking sheet. Reheat at 375°F (190°C) for about 10 minutes. The dry heat restores some of the original crunch.
- Air fryer method (crispiest) — Set the air fryer to 375°F (190°C) and cook for 5 to 7 minutes, shaking the basket halfway through. Spray lightly with oil for extra crispness.
- Stovetop method (quickest) — Heat a nonstick skillet over medium heat with a teaspoon of oil. Add the chicken in a single layer and cook 2 to 3 minutes per side. Do not crowd the pan.
- Skip the microwave completely — It turns the coating rubbery and the sauce separates. The oven or air fryer takes only a few more minutes and gives far better results.
Nutritional Breakdown (Per Serving)
Based on one serving of the recipe as written, including all the sauce and garnish.
- Calories — 567
- Protein — 56g
- Fat — about 18g
- Carbohydrates — around 45g
- Fiber — 0g
- Sugar — about 21g
- Sodium — 715mg
- Cholesterol — roughly 175mg (estimated from 1 large egg and chicken breast)
These numbers will shift if you swap ingredients or adjust the sugar and soy sauce amounts.
FAQs
Can I make Pioneer Woman Orange Chicken ahead of time?
You can fry the chicken a few hours ahead and keep it at room temperature on a wire rack. Make the sauce separately, then reheat both and toss just before serving. The crust stays reasonably crisp this way.
Why did my coating fall off during frying?
Most likely the chicken was not dry enough before the egg wash, or the oil was not hot enough. Pat the cubes dry with paper towels and verify the oil hits 350°F before adding any chicken.
Can I bake the chicken instead of frying it?
Yes, but the texture will be different. Bake the coated pieces on a wire rack set over a baking sheet at 425°F (220°C) for 15 to 18 minutes, flipping halfway. Spray lightly with oil first. The crust will be crunchy but not as shatteringly crisp as the fried version.
How do I keep the sauce from separating when I store it?
The cornstarch slurry can break down over time. Store the sauce separately from the chicken and reheat it gently on the stovetop, whisking in a fresh teaspoon of cornstarch slurry if it looks thin.
Is Pioneer Woman Orange Chicken gluten-free?
Not as written, because of the all-purpose flour and soy sauce. Use tamari or coconut aminos for the soy sauce and rice flour or a gluten-free all-purpose blend in place of the wheat flour. Cornstarch is naturally gluten-free.
What is the best oil for frying this recipe?
Vegetable oil, canola oil, or peanut oil all work well. They have high smoke points and neutral flavours that do not compete with the orange glaze. Avoid olive oil or butter — they burn at frying temperatures.
Try These Recipes
Final Words
This Pioneer Woman Orange Chicken delivers exactly what you want from a homemade takeout classic — bright citrus, sticky sweetness, and a crust that actually crunches. The whole process takes about 40 minutes, and most of that is hands-off frying time. Give it a try the next time a takeout craving hits. You might find yourself skipping the delivery app altogether.
Pioneer Woman Orange Chicken
Crispy fried chicken pieces are tossed in a glossy, tangy-sweet orange glaze with a subtle kick of heat. This homemade takeout classic delivers crunch in every bite, balanced by a bright citrus sauce that clings perfectly to the golden coating.
SAVE THIS RECIPE!
Get this sent to your inbox, plus get new recipes from us every week!
INGREDIENTS
INSTRUCTIONS
-
1
Prepare the chicken: Pat the chicken cubes dry with paper towels to ensure the coating adheres. In a shallow bowl, whisk together 1/2 cup cornstarch, flour, salt, and white pepper. Place the beaten egg in a second bowl. Working one piece at a time, dip chicken into egg, letting excess drip off, then dredge in the dry mixture, pressing gently to coat all sides. Shake off any excess and transfer to a plate.
-
2
Heat the oil: Pour enough vegetable oil into a large heavy-bottomed pot or Dutch oven to reach a depth of 2 inches. Attach a deep-fry thermometer and heat over medium-high until the oil reaches 350°F (175°C) — a drop of batter should sizzle immediately. Line a baking sheet with paper towels and set near the stove.
-
3
Fry the chicken in batches: Carefully add about one-third of the chicken pieces to the hot oil, avoiding overcrowding (this keeps the crust crisp). Fry for 4 to 5 minutes, turning occasionally with a slotted spoon, until deep golden brown and the internal temperature reaches 165°F (74°C). Transfer to the paper-towel-lined sheet to drain. Repeat with remaining chicken, letting the oil return to 350°F between batches.
-
4
Begin the sauce: While the chicken rests, combine orange juice, soy sauce, rice vinegar, granulated sugar, brown sugar, orange zest, garlic, ginger, and red pepper flakes in a small saucepan. Whisk to blend and place over medium heat. Cook, stirring occasionally, until the mixture comes to a full simmer and the sugars have completely dissolved, about 3 minutes.
-
5
Thicken the glaze: Give the cornstarch slurry a quick stir to recombine, then pour it into the simmering sauce while whisking constantly. Continue to whisk for 1 to 2 minutes as the sauce thickens — it should coat the back of a spoon and look glossy, like thin honey. Remove from heat and set aside.
-
6
Toss the chicken: Place all the fried chicken pieces in a large heatproof bowl. Pour the warm orange sauce over the top and use a rubber spatula or tongs to gently fold and toss until every piece is evenly coated in the sticky glaze. Work quickly so the coating stays crisp.
-
7
Garnish and serve: Transfer the glazed chicken to a serving platter or individual plates. Sprinkle with sesame seeds and sliced green onions for color and crunch. Serve immediately over steamed white rice or alongside stir-fried vegetables, as the texture softens upon standing.
-
8
Oil temperature check: If you don’t have a thermometer, test the oil by dropping a cube of bread into it — it should bubble vigorously and turn golden in 60 seconds. Adjust the burner power to maintain a steady 350°F throughout frying.
-
9
Double coating for extra crunch: For an even thicker crust, after the first dredge, dip the chicken back into the egg and then into the dry mix a second time. This adds a crunchy shell that holds up better to the sauce.
-
10
Adjusting sweetness and heat: Taste the finished sauce before tossing — if you prefer a brighter tang, add an extra tablespoon of orange juice; for more heat, double the red pepper flakes or add a pinch of cayenne. The sauce should balance sweet, salty, and citrusy notes.
-
11
Avoiding soggy chicken: Fry the chicken just until golden and cooked through — do not over-fry or it will dry out. Also, ensure the sauce is not too thin; if it runs off the chicken, simmer it a minute longer before tossing.
-
12
Scaling the recipe: To serve 8 people, double all ingredients and fry in 3 to 4 batches. Keep the first batch warm on a wire rack in a 200°F (93°C) oven while frying the rest, then toss everything together with the sauce just before serving.
NOTES
- For best crunch, fry the chicken just before serving and toss with sauce right at the table. Leftovers can be stored in an airtight container in the refrigerator for up to 3 days, but the coating will soften. Reheat in a single layer on a baking sheet at 375°F (190°C) for about 10 minutes to re-crisp. Do not microwave. To freeze, place un-glazed fried chicken in a single layer on a baking sheet, freeze solid, then transfer to a freezer bag for up to 2 months. Thaw in the fridge overnight, then reheat and toss with freshly made sauce.
NUTRITION
Serving: 1 | Calories: 567kcal | Carbohydrates: 45g | Protein: 56g | Fat: 18g | Saturated Fat: 2.9g | Cholesterol: 191mg | Sodium: 715mg | Fiber: 0g | Sugar: 21g
Nutrition information is automatically calculated, so should only be used as an approximation.