Pioneer Woman Pickled Okra
If you have never tried Pioneer Woman Pickled Okra, you are in for a treat. This tangy, slightly sweet brine with garlic, dill, and a gentle heat transforms fresh okra into a crisp, flavorful snack or side.
The pickles take just 25 minutes of hands-on time and work beautifully alongside burgers, grilled meats, or even in a Bloody Mary. The Southern-inspired brine comes together on the stovetop, and the okra stays crunchy thanks to a quick pickling method.
What are Pioneer Woman Pickled Okra?
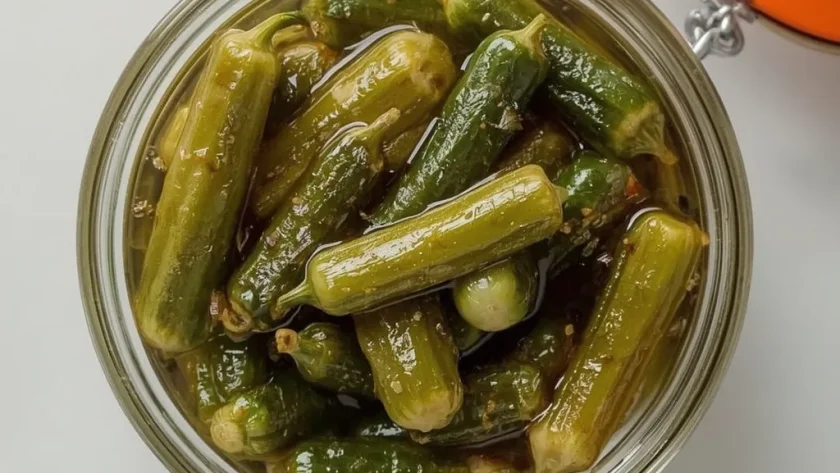
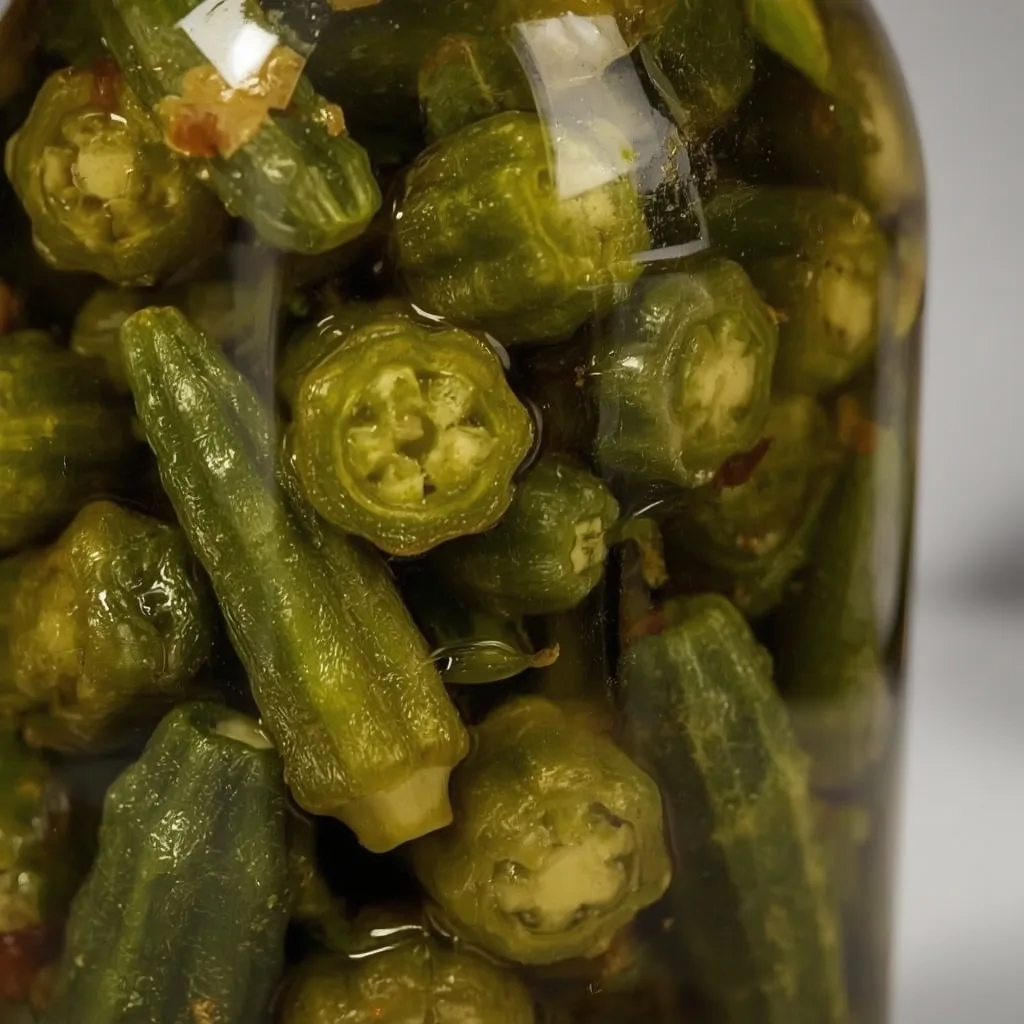
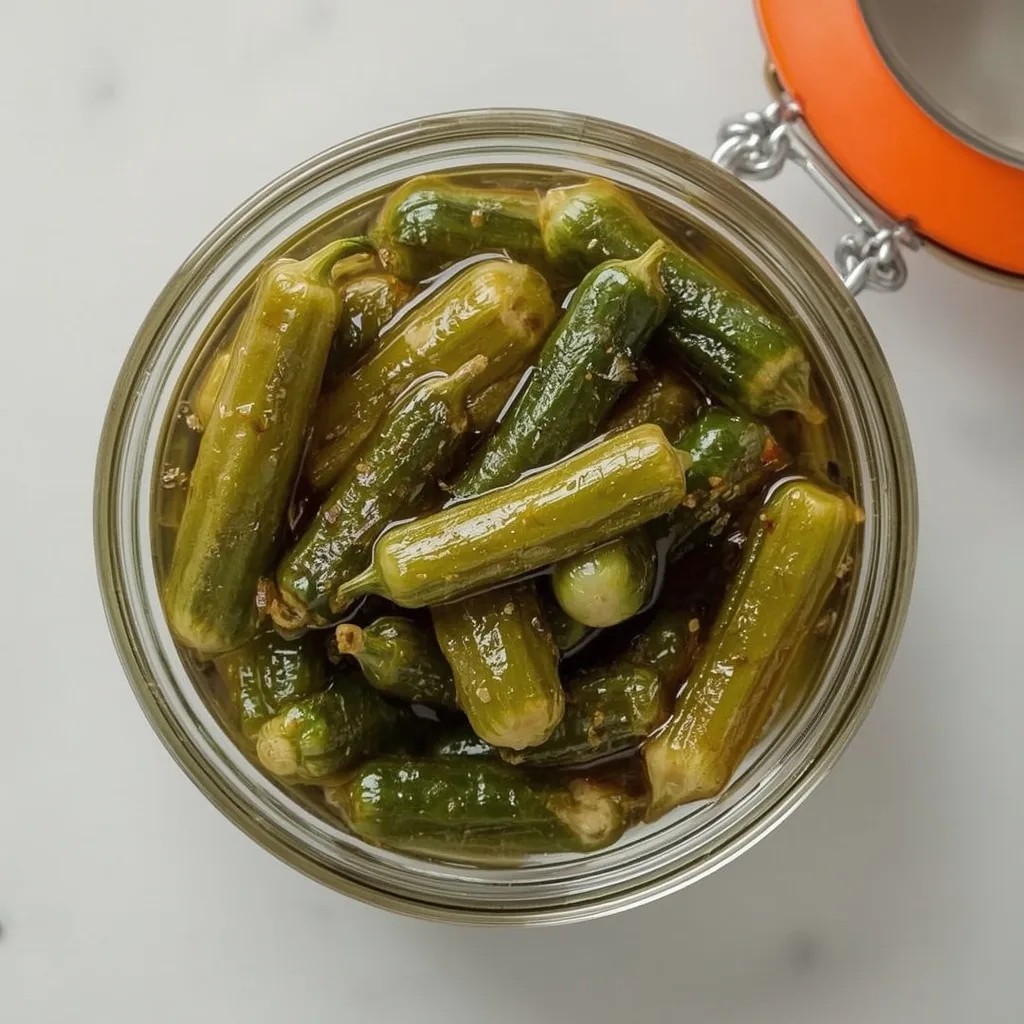
This recipe turns fresh okra pods into a tangy pickle using a simple vinegar brine. The brine includes white vinegar, water, kosher salt, sugar, garlic, dill, red pepper flakes, mustard seeds, and black peppercorns. The okra stays firm and crisp, with a bright, savory flavor that pairs perfectly with smoky or salty dishes.
Why You’ll Love This Recipe
Here is what makes this pickled okra a winner for any kitchen.
- Quick prep — The active cooking time is only 10 minutes, so you can make a batch without a huge time commitment.
- Crisp texture — The brine helps the okra hold its shape and stay crunchy, not slimy, when stored properly.
- Customizable heat — You control the spice by adjusting the red pepper flakes or leaving them out entirely.
- Long fridge life — Once pickled, the okra keeps in the refrigerator for up to 3 months, so you always have a tangy snack on hand.
- Versatile serving — Serve chilled or at room temperature with sandwiches, cheese boards, or as a garnish for cocktails.
- No canning required — The recipe works as a refrigerator pickle, but you can process it for shelf-stable storage if you prefer.
Essential Ingredients for Pioneer Woman Pickled Okra
You only need a handful of pantry staples and fresh produce to make this recipe work.
Fresh Produce
- 1 lb fresh okra — Look for small, tender pods that are firm and bright green. Larger pods can become tough and fibrous.
- 3 cloves garlic — Peel and lightly crush them to release their flavor into the brine without making it cloudy.
- 2 sprigs fresh dill — Use fresh dill sprigs or substitute 1 tablespoon dill seeds if fresh is unavailable.
Spices
- 1 teaspoon red pepper flakes — This adds a moderate heat. Cut to ½ teaspoon for a milder pickle, or omit it completely for no heat.
- 1 teaspoon yellow mustard seeds — They bring a mild, tangy pop and a pleasant texture.
- ½ teaspoon black peppercorns — Whole peppercorns infuse a gentle warmth without making the brine cloudy.
Brine
- 1.5 cups white vinegar (5% acidity) — Standard white vinegar gives the clean, sharp tang needed for proper pickling.
- 1.5 cups water — Tap or filtered water works fine. No need to use distilled.
- 3 tablespoons kosher salt — Use coarse kosher salt, not table salt, to avoid an overly salty brine.
- 3 tablespoons granulated sugar — Balances the vinegar’s acidity and adds a subtle sweetness.
Equipment You’ll Need
Gather these tools before you start, and the process will go smoothly.
- 1-quart mason jar with lid — A wide-mouth jar makes packing the okra easier. Sterilize it by boiling for 5 minutes.
- Medium stainless steel or nonreactive saucepan — Avoid aluminum, which can react with the vinegar and alter the flavor.
- Clean kitchen towel or wire rack — Use this to let the jar cool after sealing.
- Chopstick or slim spatula — Essential for releasing trapped air bubbles after pouring the brine.
- Clean, damp cloth — Wipe the rim of the jar before sealing to ensure a good vacuum seal.
Instructions to Make Pioneer Woman Pickled Okra
Follow these steps in order, and you will have a jar of crisp, tangy okra ready in about 25 minutes of active time.
- Prep the okra — Wash the pods under cold water, then pat them completely dry. Trim the very tip of the stem end, leaving the cap intact so the pods stay whole during pickling.
- Sterilize the jar — Submerge the jar and lid in boiling water for 5 minutes, then let them air-dry upside down on a clean towel.
- Pack the jar — Place the okra upright into the jar, alternating directions to maximize density. Tuck the crushed garlic, dill, red pepper flakes, mustard seeds, and peppercorns evenly between the pods.
- Make the brine — In a nonreactive saucepan, combine white vinegar, water, kosher salt, and sugar. Bring to a full rolling boil over medium-high heat, stirring to dissolve the solids completely.
- Pour and release bubbles — Remove the brine from heat and pour it over the okra, leaving ¼ inch headspace. Use a chopstick to slide along the sides and between the pods to release trapped air bubbles.
- Seal and cool — Wipe the rim with a damp cloth, then seal the jar fingertip-tight. Let it cool at room temperature for 1 to 2 hours. You should hear a faint pop as the lid seals.
- Refrigerate and wait — Transfer the jar to the fridge and let the okra pickle for at least 48 hours before eating. The flavor deepens and any sliminess fades during this rest.
- Serve — Remove the okra with tongs, letting excess brine drip off. Serve chilled or at room temperature.
Common Mistakes I Made (And How I Fixed Them)
I learned these lessons the hard way, so you can avoid them.
- Not drying the okra thoroughly — Wet pods can water down the brine. Now I pat them dry with a towel until no moisture remains.
- Overpacking the jar — Squeezing too many pods makes it hard for the brine to circulate. I alternate directions and leave a little space.
- Skipping the air bubble release — Trapped bubbles can cause uneven pickling and spoilage. I always run a chopstick along the sides before sealing.
- Using table salt instead of kosher — Table salt is denser and makes the brine far too salty. I now use only kosher salt for the right balance.
- Tasting before 48 hours — The okra needs that full rest to absorb the brine and lose its natural sliminess. I wait the full two days.
- Leaving the jar in a drafty spot while cooling — It can cause the seal to fail. I let it cool on a towel in a still, warm area.
Best Tips for Pioneer Woman Pickled Okra Success
These small adjustments make a big difference in the final texture and flavor.
- Keep the okra whole — Slicing the pods releases their inner gel and can make the brine cloudy. Leave them intact for the best texture.
- Use the freshest okra you can find — Limp or overly mature pods turn chewy. Buy firm, bright green pods with no blemishes.
- Do not skip the sterilization step — Even for refrigerator pickles, a quick boil prevents unwanted bacteria from spoiling the batch.
- Let the brine cool slightly before pouring — A full rolling boil can cause some okra to soften. Pour it right after removing from heat, but let it sit for 30 seconds if the jar is glass.
- Add calcium chloride for extra crunch — If you want that crisp snap, stir ¼ teaspoon Pickle Crisp into the jar before pouring the brine.
- Label the jar with the date — This helps you track the 48‑hour rest and the 3‑month fridge life. Write on the lid or use a piece of tape.
- Store the jar upright in the fridge — Laying it on its side can cause leaking or a broken seal. Keep it standing for the full shelf life.
Best Ingredient Swaps for Pioneer Woman Pickled Okra
Need to adjust based on what you have on hand? These swaps work well.
- Fresh dill instead of seeds — If you do not have dill sprigs, use 1 tablespoon dill seeds. They infuse a milder flavor but still taste authentic.
- Apple cider vinegar — Replace the white vinegar with apple cider vinegar for a fruitier, rounder tang. The color will darken slightly.
- Honey instead of sugar — Use 2 tablespoons honey in place of the granulated sugar. The brine will be slightly less clear but still delicious.
- Crushed red pepper flakes optional — For zero heat, leave out the red pepper flakes entirely. The pickles will still have plenty of flavor from the garlic and dill.
- Pickling spice blend — Swap the mustard seeds and peppercorns for 1 teaspoon of a store‑bought pickling spice mix. Taste will vary, but it is a convenient shortcut.
Delicious Variations to Try
Once you have the basic recipe down, these twists keep things interesting.
- Spicy jalapeño okra — Add 1 sliced jalapeño (seeds removed if you want less heat) to the jar along with the other spices. The heat builds over the first week.
- Garlic‑herb version — Double the garlic and add 1 teaspoon dried oregano or thyme. The herbs give a Mediterranean twist that pairs well with olives and cheese.
- Sweet and sour okra — Increase the sugar to 4 tablespoons and add 1 tablespoon of honey. The extra sweetness balances the vinegar beautifully.
- Smoky chipotle okra — Add 1 chipotle pepper in adobo sauce (finely chopped) to the brine. The smokiness works great with grilled meats.
- Dill‑pickle style — Add 2 extra dill sprigs and 1 teaspoon of dill seed. This intensifies the classic pickle flavor that pairs perfectly with burgers.
- Lemon‑pepper okra — Add the zest of 1 lemon and ½ teaspoon cracked black pepper. The citrus brightens the brine and complements seafood dishes.
How to Store Leftovers Properly
Keep your pickled okra at its best with these storage guidelines.
- Refrigerator — Store the sealed jar in the refrigerator for up to 3 months. Always keep the jar upright to prevent leaks.
- Freezing (not recommended) — Freezing can turn the okra mushy and ruin the crisp texture. It is best to stick to refrigeration.
- Shelf‑stable option — If you process the jar in a boiling water bath canner for 10 minutes (adjust for altitude), the pickles can be stored in a cool, dark pantry for up to a year.
- After opening — Once you start using the pickles, keep the jar refrigerated and use a clean utensil each time to avoid introducing bacteria.
How to Reheat Pioneer Woman Pickled Okra
These pickles are usually served cold, but if you want them warm, here is how.
- Microwave — Place a few okra pods on a microwave‑safe plate and heat on high for 15 to 20 seconds. They will be warm but still slightly crisp.
- Stovetop — Heat a nonstick skillet over medium heat for 1 minute, then add the okra (no oil needed). Toss for 1 to 2 minutes until just warmed through.
- Oven — Spread the okra on a baking sheet and warm in a 350°F oven for 3 to 4 minutes. Watch closely; they can dry out quickly.
- Air fryer — Set the air fryer to 350°F and cook the okra for 2 to 3 minutes. They will get slightly crispy on the outside while staying tender inside.
Nutritional Breakdown (Per Serving)
Each serving (about ¼ of the jar) contains:
- Calories: 82
- Protein: 2g
- Fat: 0g
- Carbohydrates: 20g
- Fiber: 4g
- Sugar: 13g
- Sodium: about 5175mg
- Cholesterol: around 0mg
FAQs
Can I freeze Pioneer Woman Pickled Okra?
Freezing is not recommended because the okra will lose its crisp texture and become mushy when thawed. Stick to refrigeration for the best results.
How long does it take for the okra to pickle?
The okra needs at least 48 hours in the refrigerator to fully absorb the brine and develop flavor. The texture also improves during that rest period.
Why is my pickled okra slimy?
Sliminess usually comes from not drying the okra thoroughly before packing, or from skipping the 48‑hour refrigeration. Pat the pods completely dry and wait the full two days.
Can I reuse the brine for another batch?
Reusing brine is not recommended because the acidity and seasoning are diluted after the first use. Make a fresh brine for each new batch.
Do I have to use kosher salt?
Kosher salt is recommended because it dissolves evenly and has a lower density than table salt. If you use table salt, reduce the amount by half, or the brine will be too salty.
How do I know if the jar sealed properly?
After cooling, press the center of the lid. If it does not pop back, it is sealed. You should also hear a faint pop during cooling. Refrigerator pickles do not require a vacuum seal, but it helps with long‑term storage.
Try These Recipes
Final Words
Pioneer Woman Pickled Okra is one of those recipes that takes almost no effort but delivers big flavor. The crisp pods, tangy brine, and subtle heat make it a standout addition to any meal. Give it a try — you will be happy you did.
Pioneer Woman Pickled Okra
Crisp-tender okra pods in a tangy, slightly sweet brine with garlic, dill, and a hint of heat. These spicy-sour pickles are a classic Southern side or snack, perfect for summer cookouts or adding a crunch to Bloody Marys.
SAVE THIS RECIPE!
Get this sent to your inbox, plus get new recipes from us every week!
INGREDIENTS
INSTRUCTIONS
-
1
Wash the okra pods under cold running water, then pat completely dry with a clean kitchen towel. Trim the very tip of each stem end, leaving the cap intact so the pods remain whole and hold their shape during pickling.
-
2
Sterilize a 1-quart mason jar and its lid by submerging them in boiling water for 5 minutes, then let them air-dry upside down on a clean towel. This step prevents unwanted bacteria from spoiling the pickles.
-
3
Pack the prepared okra into the sterilized jar upright, alternating directions to maximize density. Tuck the crushed garlic cloves, dill sprigs or seeds, red pepper flakes, mustard seeds, and peppercorns evenly between the pods as you layer.
-
4
In a medium stainless steel or nonreactive saucepan, combine the white vinegar, water, kosher salt, and granulated sugar. Bring the mixture to a full rolling boil over medium-high heat, stirring occasionally to dissolve the salt and sugar completely.
-
5
Once the brine reaches a vigorous boil and all solids are dissolved, remove the saucepan from the heat immediately. Prolonged boiling can cause vinegar to evaporate, altering the brine’s acidity balance.
-
6
Pour the hot brine over the packed okra in the jar, leaving about 1/4 inch headspace at the top. Use a chopstick or slim spatula to gently release any trapped air bubbles by sliding it along the inner sides of the jar and between the pods.
-
7
Wipe the rim of the jar with a clean, damp cloth to remove any brine residue, then seal with the lid and screw band fingertip-tight. The hot liquid will create a vacuum seal as it cools.
-
8
Let the sealed jar cool completely at room temperature on a wire rack or kitchen towel, about 1 to 2 hours. You should hear a faint pop as the lid seals — this indicates a good vacuum.
-
9
Once the jar is cool to the touch, transfer it to the refrigerator and allow the okra to pickle for at least 48 hours before consuming. The flavor deepens and the okra loses its sliminess during this rest period.
-
10
After the initial pickling period, the okra will keep in the refrigerator for up to 3 months. For longer storage, process the jar in a boiling water bath canner for 10 minutes (adjust for altitude) — this recipe makes a shelf-stable product.
-
11
To serve, remove the okra from the brine with tongs, letting excess drip off. Serve chilled or at room temperature alongside grilled meats, sandwiches, or as a tangy addition to a cheese board.
NOTES
- For a milder pickle, reduce the red pepper flakes to 1/2 teaspoon or omit them entirely.
- Use only fresh, firm okra — limp or overly large pods can become tough and fibrous.
- If you prefer extra-crispy okra, add 1/4 teaspoon calcium chloride (Pickle Crisp) to the jar before pouring the brine.
- Do not skip the 48-hour refrigeration period; the okra needs time to absorb the brine and mellow the sliminess.
NUTRITION
Serving: 1 | Calories: 82kcal | Carbohydrates: 20g | Protein: 2g | Fat: 0g | Saturated Fat: 0g | Cholesterol: 0mg | Sodium: 5175mg | Fiber: 4g | Sugar: 13g
Nutrition information is automatically calculated, so should only be used as an approximation.